
As I hobby I like to homebrew beer. Nothing too crazy but just a few cases a couple of times a year. It’s fun to do and makes for a nice gift option for friends and family as well. Recently I starting thinking more about gathering data during the brewing process. Mostly I was interested in temperature as different stages of the brew process require specific temperature ranges. These vary depending on the type of beer but it’s important so you don’t kill the yeast during fermentation. In the past I’ve used a manual thermometer but wanted something more hands off.
I didn’t want to build something myself as there is a great consumer market and DIY space for this type of stuff already. My only real requirement was that I get the information into Home Assistant since that is where I try and keep all my dashboards and data for ease of use. As I spiraled down the rabbit hole of possible options I ended up having to do some on-the-fly thinking to get it all working.
Table of Contents
Hardware
There are lots of options for home brew off-the-shelf and DIY hardware. It’s likely anyone involved in home brewing has heard of projects like the BrewPi for monitoring and control. I wasn’t concerned with controlling temperature so much as monitoring it so ultimately what I needed was just a thermometer.
I ran across this cool little device called Tilt. It’s a combination hydrometer and thermometer that floats in your brew bucket (or carboy) so you can get readings during the process. I liked this idea right away since it’s dead simple, affordable, and the hardware was pre-made - meaning I didn’t have to go down the route of making something with an ESP32 or Raspberry Pi. To further sweeten the deal there is Home Assistant integration for it as well. It uses Bluetooth, which I am generally not a fan of for home automation, but in reading more about the device it uses low energy Bluetooth packets instead of pairing directly with something. This extends the battery life and makes it easier for another device to capture the data.
My general thoughts for getting an integration going were pretty simple:
- Buy a Tilt
- Utilize ESPHome BLE proxies to gather information
- Integrate with Home assistant
- Make a Dashboard.
I thought I had it all figured out so I pulled the trigger on ordering one for my next batch.
The First Attempt
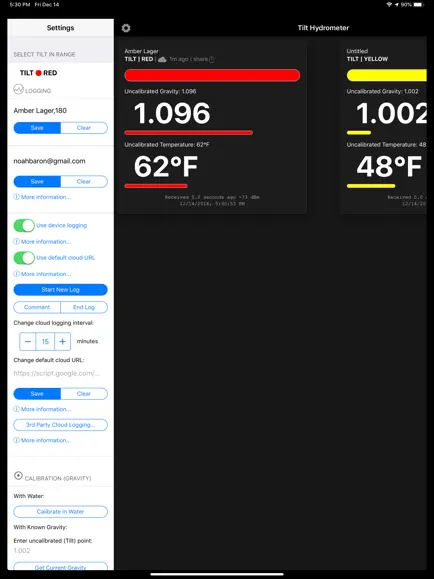
Once the Tilt arrived in the mail I threw it in some water to test it out. Right away I ran into a problem. The Tilt App wouldn’t work on my Android phone. The Android OS on my device was too new for the app in the App Store. I grabbed my daughter’s iPad and was happy to see the iOS version would install. The app loaded and found the device quickly. It’s a pretty simple interface but got the job done.
Since I wanted to capture and store the data the iPad wouldn’t work long term. I needed a device that was always listening for the broadcast packets. My first thought was to use an ESPHome BLE proxy. This is a really awesome feature of ESPHome that allows compatible ESP32 hardware to act as a “local” Bluetooth device for Home Assistant integration purposes. In a nutshell instead of pairing a Bluetooth device to your phone or tablet you pair it to Home Assistant and the ESPHome proxy devices capture and send the data back to Home Assistant. The real power is you can have multiple instances of these around your home so if the device moves (a common thing with Bluetooth devices) a different proxy can find the device and get the data.
I have 6 ESP32 devices around my house so I figured one of them would support the Bluetooth Proxy component. I was wrong. In the end I found that I have only one device with an integrated Bluetooth radio. One was all I needed but then I hit another road block. The device in question is attached to a Neopixel ring. The ring lights up in different colors to notify of different events (garage door opening, door bell, etc). The Neopixel component of ESPHome is incompatible with the requirements needed to also run the Bluetooth Proxy component. I couldn’t repurpose the device so I ran in to a dead end here.
The Second Attempt
Realizing I had to re-think my process I started looking in to other options. Surely someone had tried to think up an answer to this type of issue before? As it turns out the people behind Tilt do offer their own solution known as a TiltPi. This is a local web service that uses the Bluetooth radio in a Raspberry Pi to collected the Tilt readings. I have some Raspberry Pi devices in service doing other things so thought I could layer this in.
While searching for the source code for the TiltPi I also stumbled upon Pitch. In the description of the project it states “The Tilt hardware is impressive, but the mobile apps and TiltPi are confusing and buggy.”. My experience with the Android app earlier confirmed this might be the case. Rather than going down the road of the TiltPi I shifted gears to giving this a try. The Pitch project had multiple integrations but one in particular caught my eye - the webhook. This would send the Tilt readings, via an HTTP request, to any configured web URL. I refined my integration strategy from above:
Buy a Tilt.- Install Pitch on a Pi W I had already
- Configure Pitch to send a webhook to Home Assistant
- Create a Home Assistant Automation to capture the webhook and set some MQTT topics
- Utilize an MQTT Sensor to expose the information in Home Assistant.
- Make a Dashboard.
Definitely more involved than the first idea but this would work.
Getting Pitch Working
For the most part Pitch ran exactly as specified in the Github Repo so I’ll bypass that part of the setup. The only modification I had to make was to fix an error I had the first time running it. The project states it works with Python 3.7 or greater but the required libraries don’t have pinned versions. As a result a library called pyfiglet downloaded it’s latest version, which didn’t work on Python 3.8. My Rpi does some other things and I didn’t want to mess with the base Python version so I instead pinned the library to a version known to work with Python 3.8. In the end I modified the requirements file to read pyfiglet<1 to get a version that would work. Note: this fix was later integrated to the main repo via a pull request.
Included in the examples directory is a systemd file to run the whole thing as a service. The instructions aren’t super clear but you have to modify it for paths on your system and then move it to the right folders on your system.
sudo mv pitch.service /etc/systemd/system
sudo systemctl enable pitch
sudo systemctl start pitch
I also modified the Pitch setup file a bit so that the webhooks don’t fire as often. The Tilt is pretty chatty and will send updates basically once a second. This slows things down to every 30 seconds in Home Assistant. Note the Home Assistant URL - this is setup as part of the automation below.
{
  "queue_empty_sleep_seconds": 2,
  "queue_size": 2,
  "green_name": "My Beer",
  "green_original_gravity": 1.050,
  "prometheus_enabled": false,
  "webhook_limit_period": 30,
  "webhook_urls": [
    "http://ip:8123/api/webhook/-C1XgmLYl0jCWyazXyV-8lNS9"
  ]
}
Home Assistant Setup
Setup The Webhook
Since Pitch is sending the data to Home Assistant it needs a web hook endpoint to capture the data. Home Assistant supports webhook triggers for automations. The instructions are fairly clear; I simply selected webhook as the Trigger type. Home Assistant spits out a randomly generated endpoint ID. Clicking the copy button to get the full URL I just pasted this into the pitch.json file as shown above.
Tilt sends a JSON payload so for the rest of the Automation I figured the easiest thing to do was to retain it in an MQTT topic. This way I could set it up as an MQTT Sensor. To do this I used the mqtt.publish service. Note that I’m using the color of the Tilt to set the topic. Just a bit of future proofing as Pitch could get information from multiple Tilt devices, each with a different color. Future Enhancement: Pitch integrates with a lot of services, if it could send to MQTT directly the webhook in Home Assistant could be cut out completely. I might tackle this later to reduce complexity.
Full Automation:
alias: Brewing - Tilt
description: update tilt sensor information
trigger:
  - platform: webhook
    allowed_methods:
      - POST
    local_only: true
    webhook_id: "-XNHMrTWaErtLzUy-8lNS9"
condition: []
action:
  - service: mqtt.publish
    data_template:
      qos: "1"
      retain: true
      topic: tilt/{{ trigger.json.color }}
      payload: "{{ trigger.json | to_json }}"
mode: single
Setup Sensors
Once the information was being sent to MQTT I needed a few sensors to be able to use everything in a dashboard. I decided to create a gravity and temperature sensor since those were the two main values collected. I dumped the rest of the values to the sensor attributes just in case I wanted them later.
mqtt:
  sensor:
    - name: Tilt Green Temperature
      state_topic: "tilt/green"
      value_template: " {{ value_json.temp_fahrenheit }}"
      icon: mdi:thermometer
      device_class: temperature
      unit_of_measurement: "°F"
      json_attributes_topic: "tilt/green"
      json_attributes_template: "{{ value_json | tojson }}"
    - name: Tilt Green Gravity
      state_topic: "tilt/green"
      value_template: " {{ value_json.gravity }}"
      icon: mdi:gauge
      json_attributes_topic: "tilt/green"
      json_attributes_template: "{{ value_json | tojson }}"
Dashboard
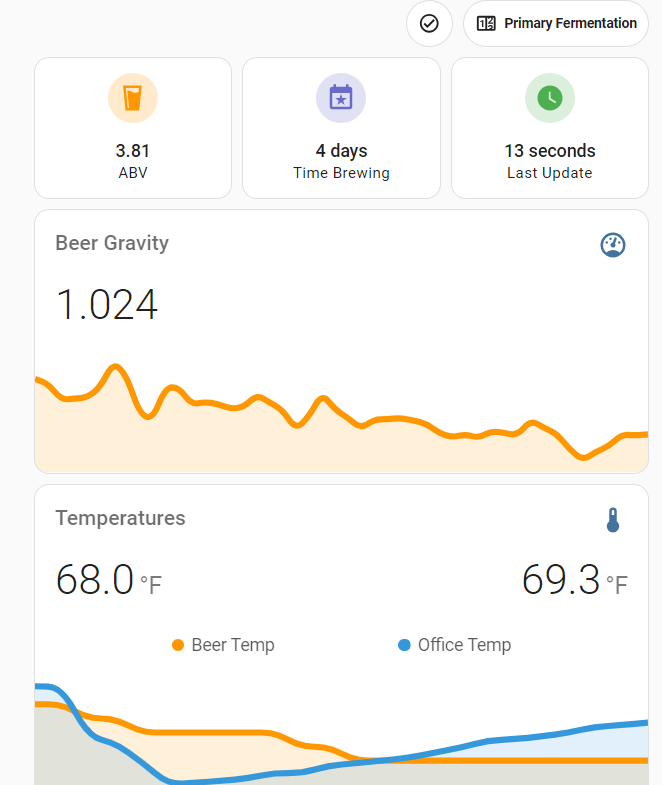
Finally I could get to the part I wanted - a dashboard. I decided I wanted a few graphs, utilizing the excellent Mini Graph Card Lovelace plugin. I’m graphing both the Beer Gravity and Temperature over a 24 period. For fun I also added the temp sensor from another device in that same room to compare the room to the beer temp.
To make sure the entire system is working I also used a template to show the last update time for the data. This was pretty simple using a relative_time Jinja function.
{{ relative_time(as_datetime(state_attr(entity, "timestamp"))) }}
Overall I’m pretty happy with how it turned out. With the data in Home Assistant I can pull out any metrics I want since the data is all stored. The flow of data ended up being a bit more complicated than I expected but the additional dependency on the Pitch project didn’t make it too bad. If I purchase any more ESP32 devices in the future I’ll make sure they support Bluetooth so I can always migrate to my original BLE Proxy based solution later.
Links
- Tilt - Tilt bluetooth hydrometer
- Home Assistant - Open source home automation platform
- ESPHome Bluetooth Proxy - use ESP32 device to act as Bluetooth proxy
- Pitch - Python program to grab Tilt data and push it to upstream services
- Mini Graph Card - Popular Home Assistant graph card to display multiple values