
Disclaimer: This is not about replacing your doorbell with a video camera doorbell using an ESP32. There are lots of tutorials about doing that if that’s what you’re after.
For a long time I’ve hated my doorbell chime. It doesn’t get used much, but when it does I hate it. The noise is annoying and over the years our dogs have picked up on it and it triggers them to rush to the door when they hear it. I’ve always wanted to make the chime sound different or try and automate it in some way but it was a back-burner project. Recently though my wife starting working from home and the chime is disrupting online meetings. It’s loud and then the dogs bark and scramble for the door, not the most professional.
I decided to finally tackle it and see if I could replace the chime with an ESP32 to provide more flexibility and automation behind the simple push button.
Table of Contents
Don’t Rebuild The Wheel
I’ll be up front in that I didn’t build any of this in a vacuum. I started doing some research on what people had already done. There are lots of great examples of doorbell related projects. Two in particular really stood out.
- DIY Smart Doorbell For Just $2 - this is a great write-up by frenck about adding an ESP32 inline to control a traditional door chime.
- Custom Wifi Enabled Nightlight with ESPHome and Home Assistant - details controlling a NeoPixel ring with ESPHome and Home Assistant.
The first link is a great set of instructions for using an ESP32 to trigger an existing door chime. This would prove to be the basic blueprint for what I wanted. The other is a nightlight (obviously) but I figured this could be adapted into a notification light for workday meetings; solving my wife’s main problem. I decided to try and merge these two ideas and put my own spin on it. Crucially I wanted to change a few things to make this a more flexible solution. My requirements were:
- Had to fit within existing doorbell housing. This was important as all the push-button wiring for the doors went to this location already and it’s right in our kitchen, not a closet or something.
- Needed to use existing transformer for power. I didn’t have another outlet or power source easily available so powering the ESP device with existing wiring was key.
- Remove existing chime. I don’t care about the existing chime, I want to use Home Assistant to trigger any sounds or notifications.
- Responsiveness. The original chime is responsive, you push the button and it rings. The new setup needs to respond and notify quickly, within 1-2 seconds, or it’s not doing it’s job.
- Automation. The whole point to the new setup is that it should provide multiple notification channels that can be automated around times and activities in the home, seamlessly. I don’t want to have to remember to turn on/off different aspects of it.
Wiring Homework
Disclaimer: Don’t attempt any home electrical work if you aren’t allowed to by code or don’t know what you’re doing! First I did some investigating on the existing door chime. As frenck’s article explains there is a transformer that converts 120V AC current to something the chime can support. In my case this is 16V AC power. Since frenck wanted to drive the chime directly his article goes on to explain how he developed a board for his ESP32 to provide the chime with the required voltage. I didn’t need this piece, but what I did need is a way to power the ESP32. Again, frenck sidestepped this particular issue as there was an outlet nearby in his situation to power ESP board.
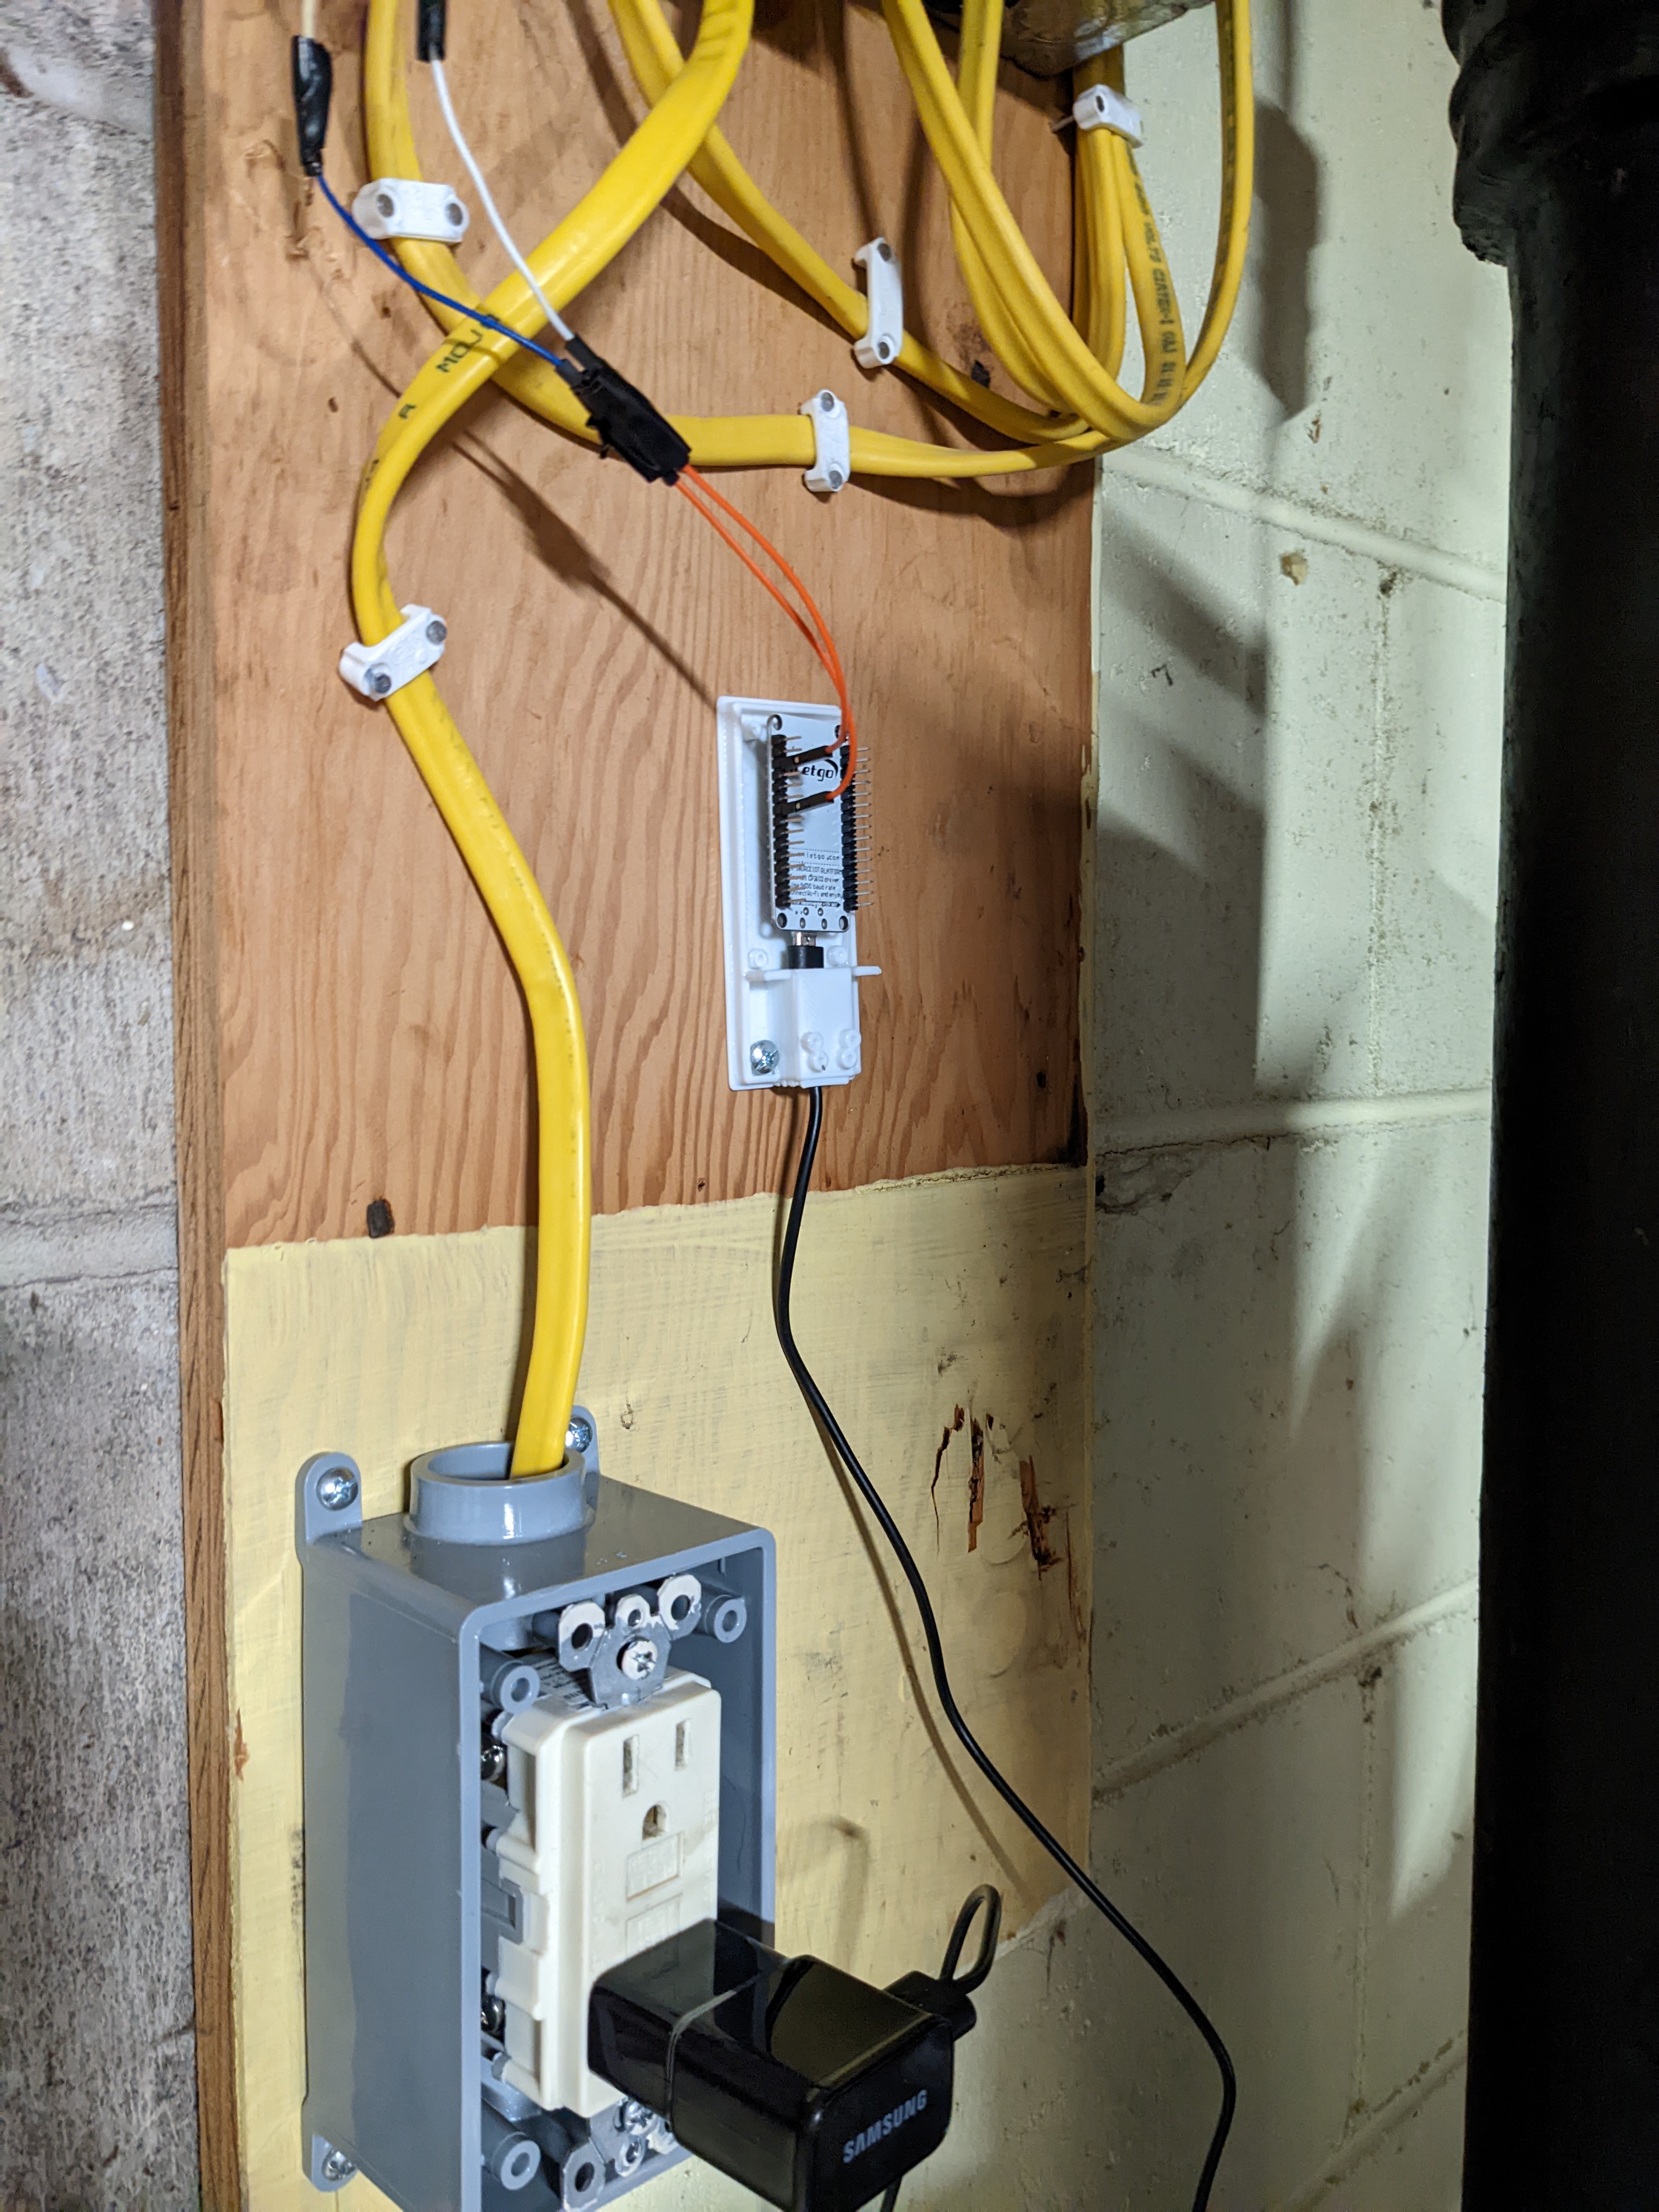
Doing some tracing on the wiring in my home I found that the power for the doorbell transformer started at a junction box in the basement. This fed regular 120V AC power up to the doorbell. With the current wiring the push of the doorbell completed the circuit to power the chime. For my new setup I only need to sense when the doorbell was pushed and not power anything, so this 120V setup could be used to power my ESP device instead. This also solved issue 1 above as I could keep the ESP32 in the basement instead of the kitchen housing. I turned off the power to this circuit and installed an outlet where the doorbell wiring started. From here I mounted my ESP32 device and plugged it directly into the outlet. The existing wiring could now be used to detect the doorbell press. Up in the kitchen I simply removed all the leads going to the doorbell chime transformer. The doorbell button now completed a circuit but didn’t directly power anything. Requirements 1, 2, and 3 achieved!.
Doorbell ESP32 Programming
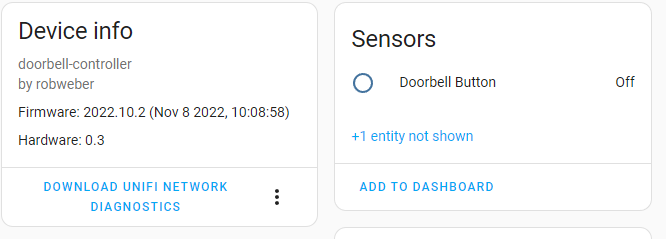
Knowing I could get the hardware to all link up I then turned to the programming. I wanted to mock-up the doorbell system with the ESP32 and test out some different automations. This was easily done with a breadboard and old pushbutton to simulate the existing doorbell connection. I’m not going to go into the detail of getting the device setup in ESPHome, frenck’s write-up has a great description of that. My full YAML code is below but this snippet gets the push button working as a binary sensor in Home Assistant.
binary_sensor:
  - platform: gpio
    id: button
    name: Doorbell
    pin:
      # this is D2 on the NodeMCU board
      number: GPIO4
      mode: INPUT_PULLUP
      inverted: true
    filters:
      - delayed_on: 10ms
      - delayed_off: 25ms
Exposed in Home Assistant I could now experiment with some Automations. Requirement 4 above stated that the system needed to retain it’s responsiveness. When the door bell button is pressed notifications should kick off very quickly. To do this I leaned on the ability to run actions in parallel within an Automation. Instead of the normal sequence method, this will have Home Assistant start running a bunch of actions all at the same time. I decided to focus on three things I wanted to have happen.
- Play a sound over some speakers in the home.
- Send a phone notification
- FUTURE ENHANCEMENT Blink a light
These would all be separate parallel actions, with the first being the in home chime notification. We have a variety of Google Assistant devices as well as Sonos speakers in our home. Since the Sonos devices could be playing music or sound from the TV I decided the chime should only come out of the Google devices. These are generally only doing something when we’re interacting with them. I created a Helper Group in HA for all the devices I wanted to play the chime sound. I linked this to a super generic chime MP3 sound to play out of the speakers. For ease of use I uploaded all the sounds to the config/www/sounds/ folder in Home Assistant. Below is the YAML snippet to play the sound as action in an Automation.
- parallel:
    - service: media_player.volume_set
      data:
        volume_level: 0.7
      target:
        entity_id:
          - media_player.google_cast_devices
    - service: media_player.play_media
      data:
        entity_id: media_player.google_cast_devices
        media_url: https://homeassistant/local/sounds/generic_bell.mp3
        media_content_type: music
    - service: media_player.volume_set
      data:
        volume_level: 0.3
      target:
        entity_id:
          - media_player.google_cast_devices
- parallel:
    - service: notify.all_phones
      data:
        message: Someone is at the front door
        title: Front Doorbell
Getting Fancy
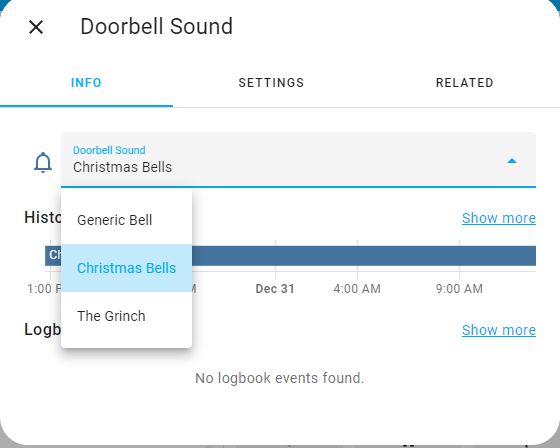
For fun I wanted the ability to swap out the chime noise. I utilized an HA Select helper to select from a variety of pre-uploaded chime noises. In the Automation I used the value of the select input to dynamically swap out the noise. I could change these as I wanted easily from my HA Dashboard. This adjusted the automation to update the sound file based on the select value.
- parallel:
    - service: media_player.volume_set
      data:
        volume_level: 0.7
      target:
        entity_id:
          - media_player.google_cast_devices
    - service: media_player.play_media
      data:
        entity_id: media_player.google_cast_devices
        media_url: >-
          {% set doorbell_sounds = {
             "Christmas Bells": "carol_of_the_bells.mp3",
             "Generic Bell": "generic_bell.mp3",
             "The Grinch": "grinch-short.mp3"
          } %} https://homeassistant/local/sounds/{{ doorbell_sounds[states('input_select.doorbell_sound')] }}
        media_content_type: music
    - service: media_player.volume_set
      data:
        volume_level: 0.3
      target:
        entity_id:
          - media_player.google_cast_devices
- parallel:
    - service: notify.all_phones
      data:
        message: Someone is at the front door
        title: Front Doorbell
Wrap Up
We’ve been using this setup for a few months now and overall it’s working as expected. Being able to change the sounds based on the time of the year has been a fun addition, and stopped the dogs from picking up on the doorbell noise. We’ve also added some timer conditions so we only get the phone notification during certain times of the day when we don’t want a chime at all.
Setting up the notification light for my wife has been another project entirely. I thought I could cover it all here but I’ll write up that in a separate post.