We recently got a second cat. It’s been a lot of fun but one thing I didn’t realize is how much more two cats were going to eat. With one cat a bowl of food lasted 2-3 days before needing refilling, with two it seems to be running low every day. To make matters worse we keep our cat food bowl in the laundry room so the food doesn’t get stolen by the dog. The phrase “out of sight, out of mind” definitely applies here and I’ll be honest they’ve run out of food enough times that something had to change.
I had two options. The first was the easy option - just get a bigger bowl. The second was the fun option - buy or build an automatic cat feeder. Obviously I went with the fun option.
Table of Contents
Requirements
Before going down an Amazon rabbit hole of options I created a wish list of features I wanted in an automatic pet feeder.
- Holds enough food - I wanted at least 10 days of food for 2 cats.
- Bowl big enough for 2 cats
- Can feed on a timer and on demand
- Integrates with Home Assistant
- Can dispense more food only when needed Bonus
- Notify me if food is running low Bonus
Other than the Home Assistant integration I thought all of these were a pretty low bar. To be fair there are a lot of existing products on the market that allow for most of these items. The one that fell short the most was holding enough food. Many of the ones I found online had very small hoppers of food, likely to reduce the footprint of the device. The feeding bowl was also just not big enough for two cats to eat at the same time. Trying to find Home Assistant integration with the feeders was also problematic. I did find some nice custom integrations but many rely on cloud connectivity. Not a deal breaker but I’d rather not have my cat feeder stop working because the cloud service became unavailable or shut down.
Just when I thought all was lost I came across the Super Feeder on Reddit.
Parts List
The Super Feeder design is a master class in simplicity. These things have apparently been on the market since the 90s; and if their website is any indication the product hasn’t needed any design iterations since then. The Super Feeder does one thing well, dispense pellet type food from a top loading hopper via a rotating gear. What makes the Super Feeder an ideal starting point for an automatic feeder is that it automatically runs a feed cycle every time it is powered on. Supply power, dispense food, turn off power. Easy. Looking at their website the unit itself held plenty of food and could be adapted to many configurations.
The Super Feeder handled dispensing the food but I’d need a few other items to meet my requirements. These could all be accomplished with ESPHome and some sensors. My parts list started to look like the following:
- Super Feeder - I went with the Wall Mount CSF-3XL option. This came with a big hopper and power supply.
- Z-wave plug switch - to cycle the feeder on/off with Home Assistant
- ESP32 device
- Load cell sensor - to place the food bowl on and detect it’s fill level
- Ultrasonic sensor - to detect food level in the hopper
- Some wood
- PVC pipes - namely a length of 2in pipe, an elbow and a 4in to 2in coupler to create a chute
- Surge protector
- Various screws, wires, and other pieces needed to put the whole thing together
The Design
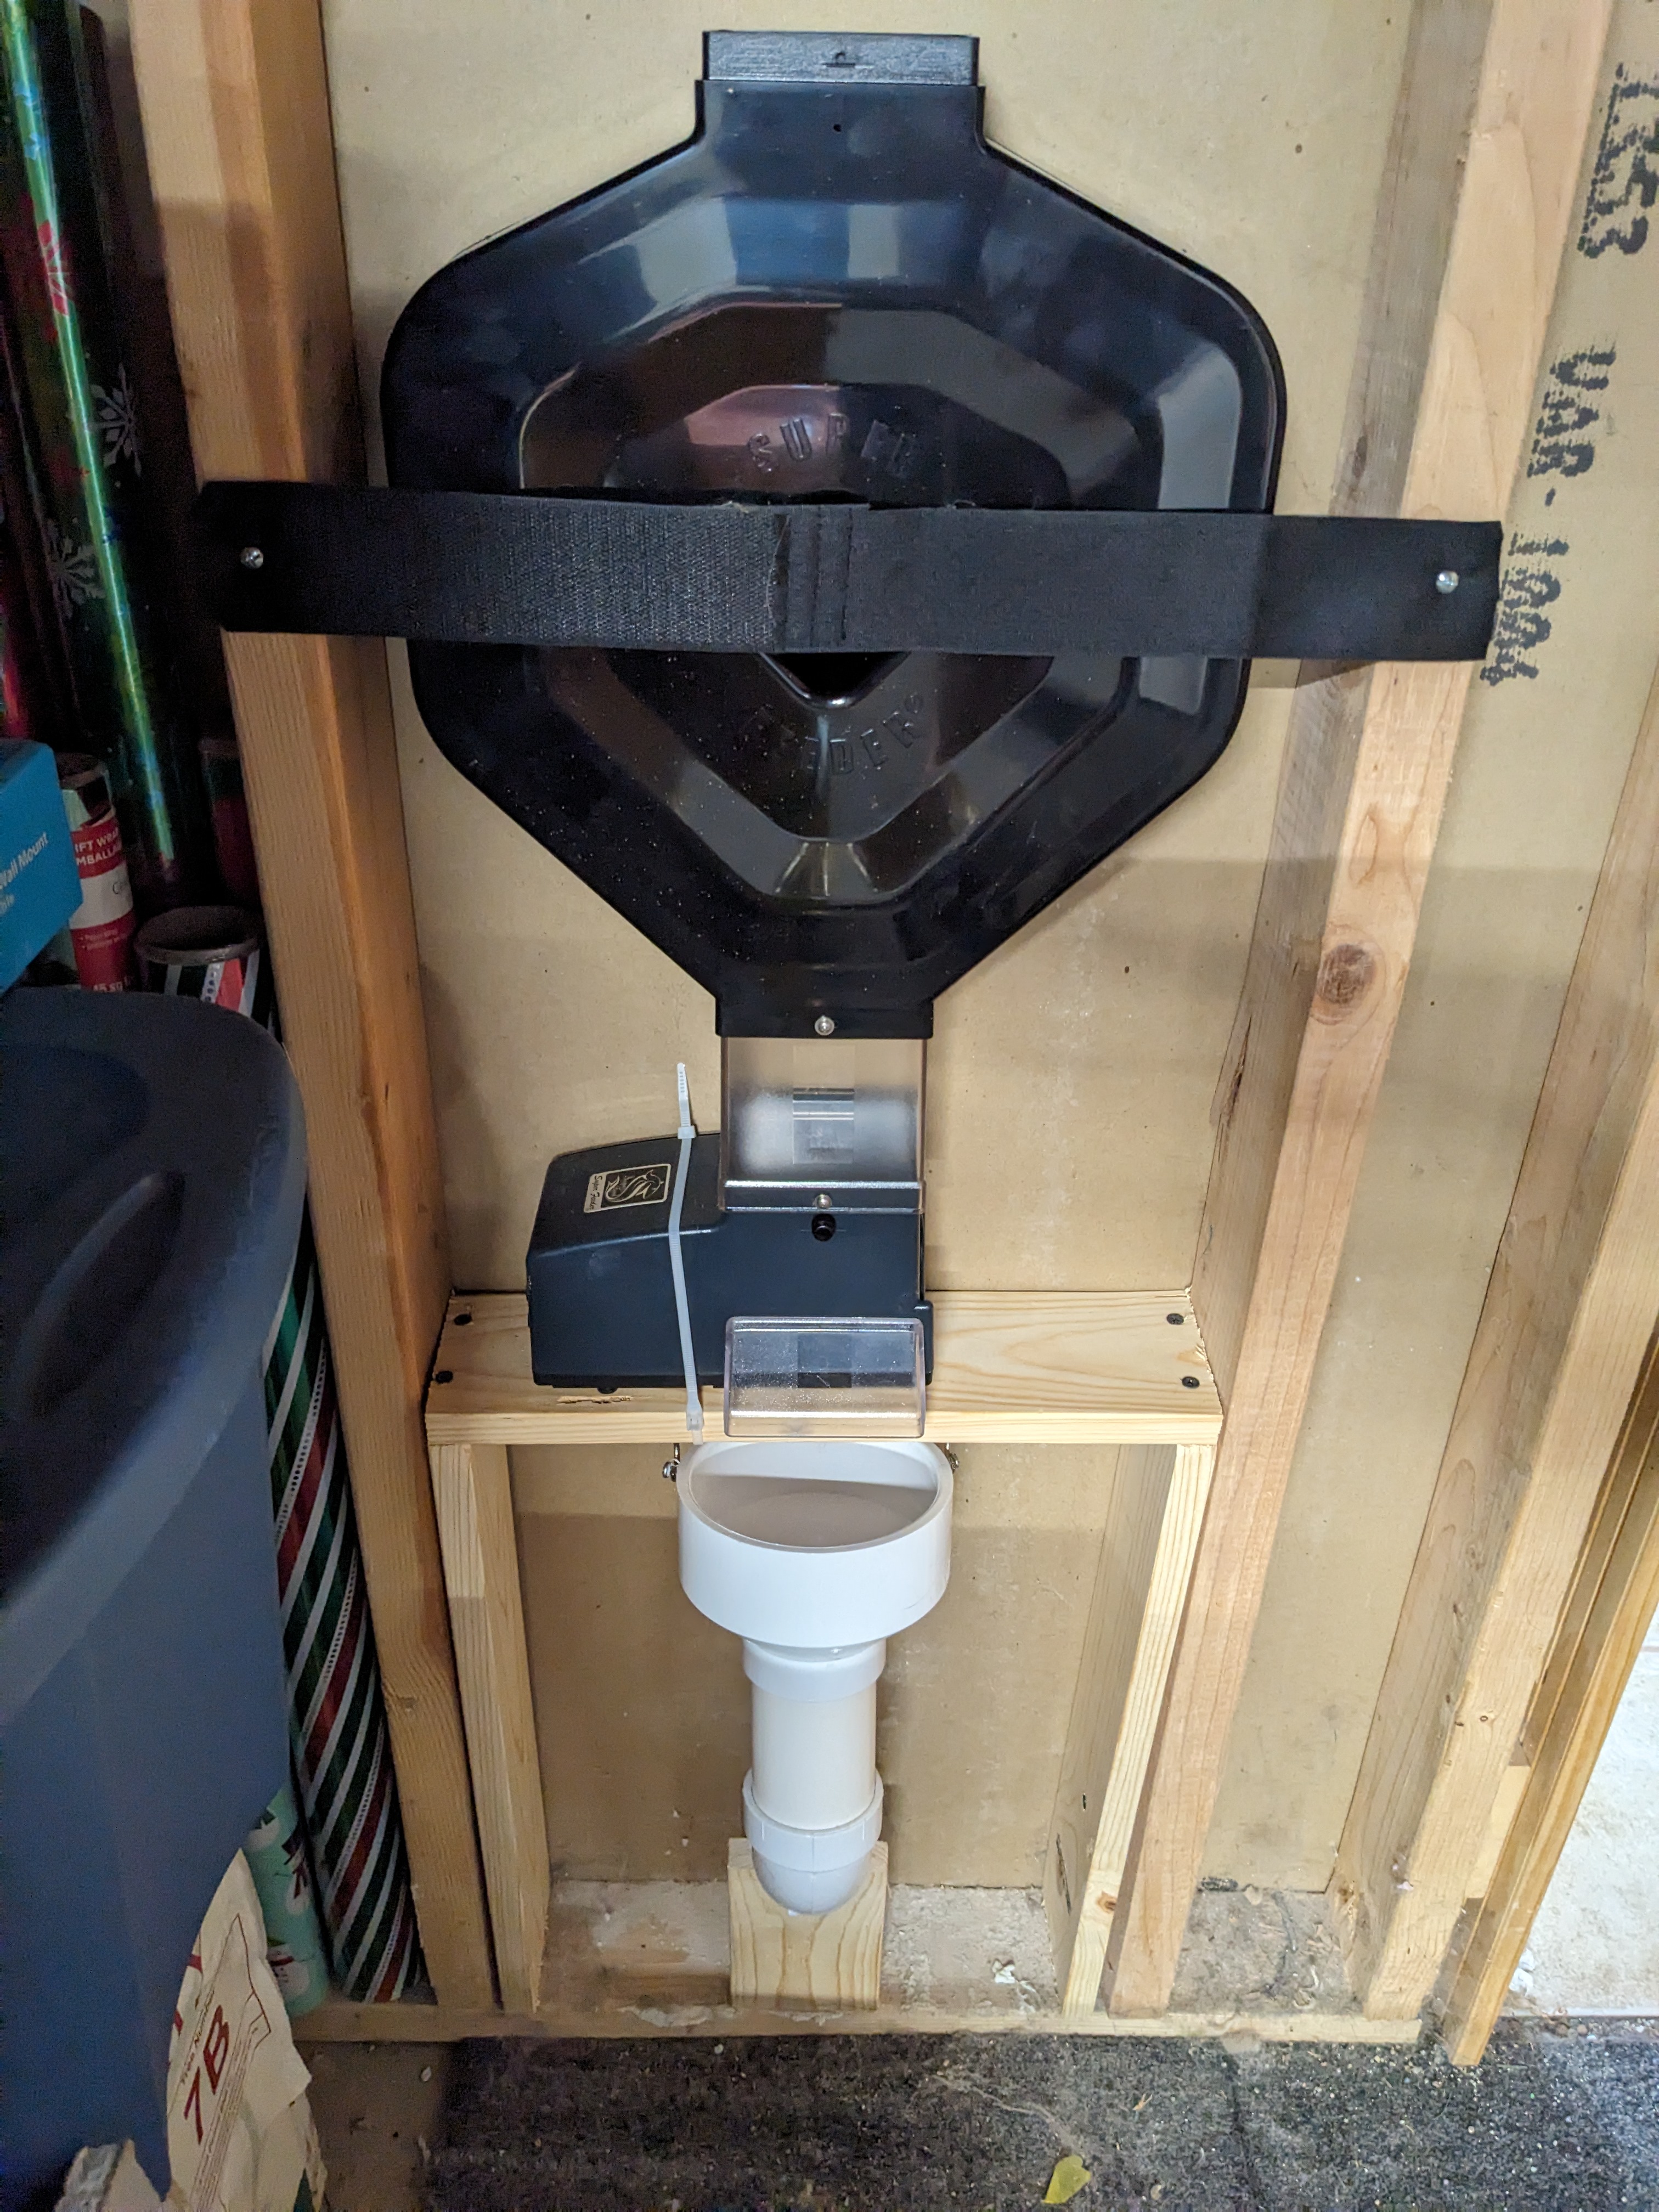
The design for the whole thing ended up looking pretty simple. Our laundry room shares a wall with the unfinished part of our basement. This would be the ideal place to mount the feeder and all the electronic pieces. It keeps the whole mess hidden and prevent curious cats from messing with it. I would put a small hole in the wall for the chute to dispense food into the bowl. I did a lot of testing of this as I went but the final iteration of the design is pictured below.

You can see I built a small frame to fit between the wall 2x4s. The Super Feeder is zip-tied to it. The hopper is pretty secure on the unit but just to make sure I added the safety strap across the top. It was important to me that the whole thing be able to be removed and relocated if needed. The PVC 4in to 2in coupler is secured by means of some J hooks below the feeder mechanism. The hooks are important as it allowed me to not only secure the coupler piece but also to angle the entire chute at the correct angle. Once this was all in place and tested I moved on to the sensors.
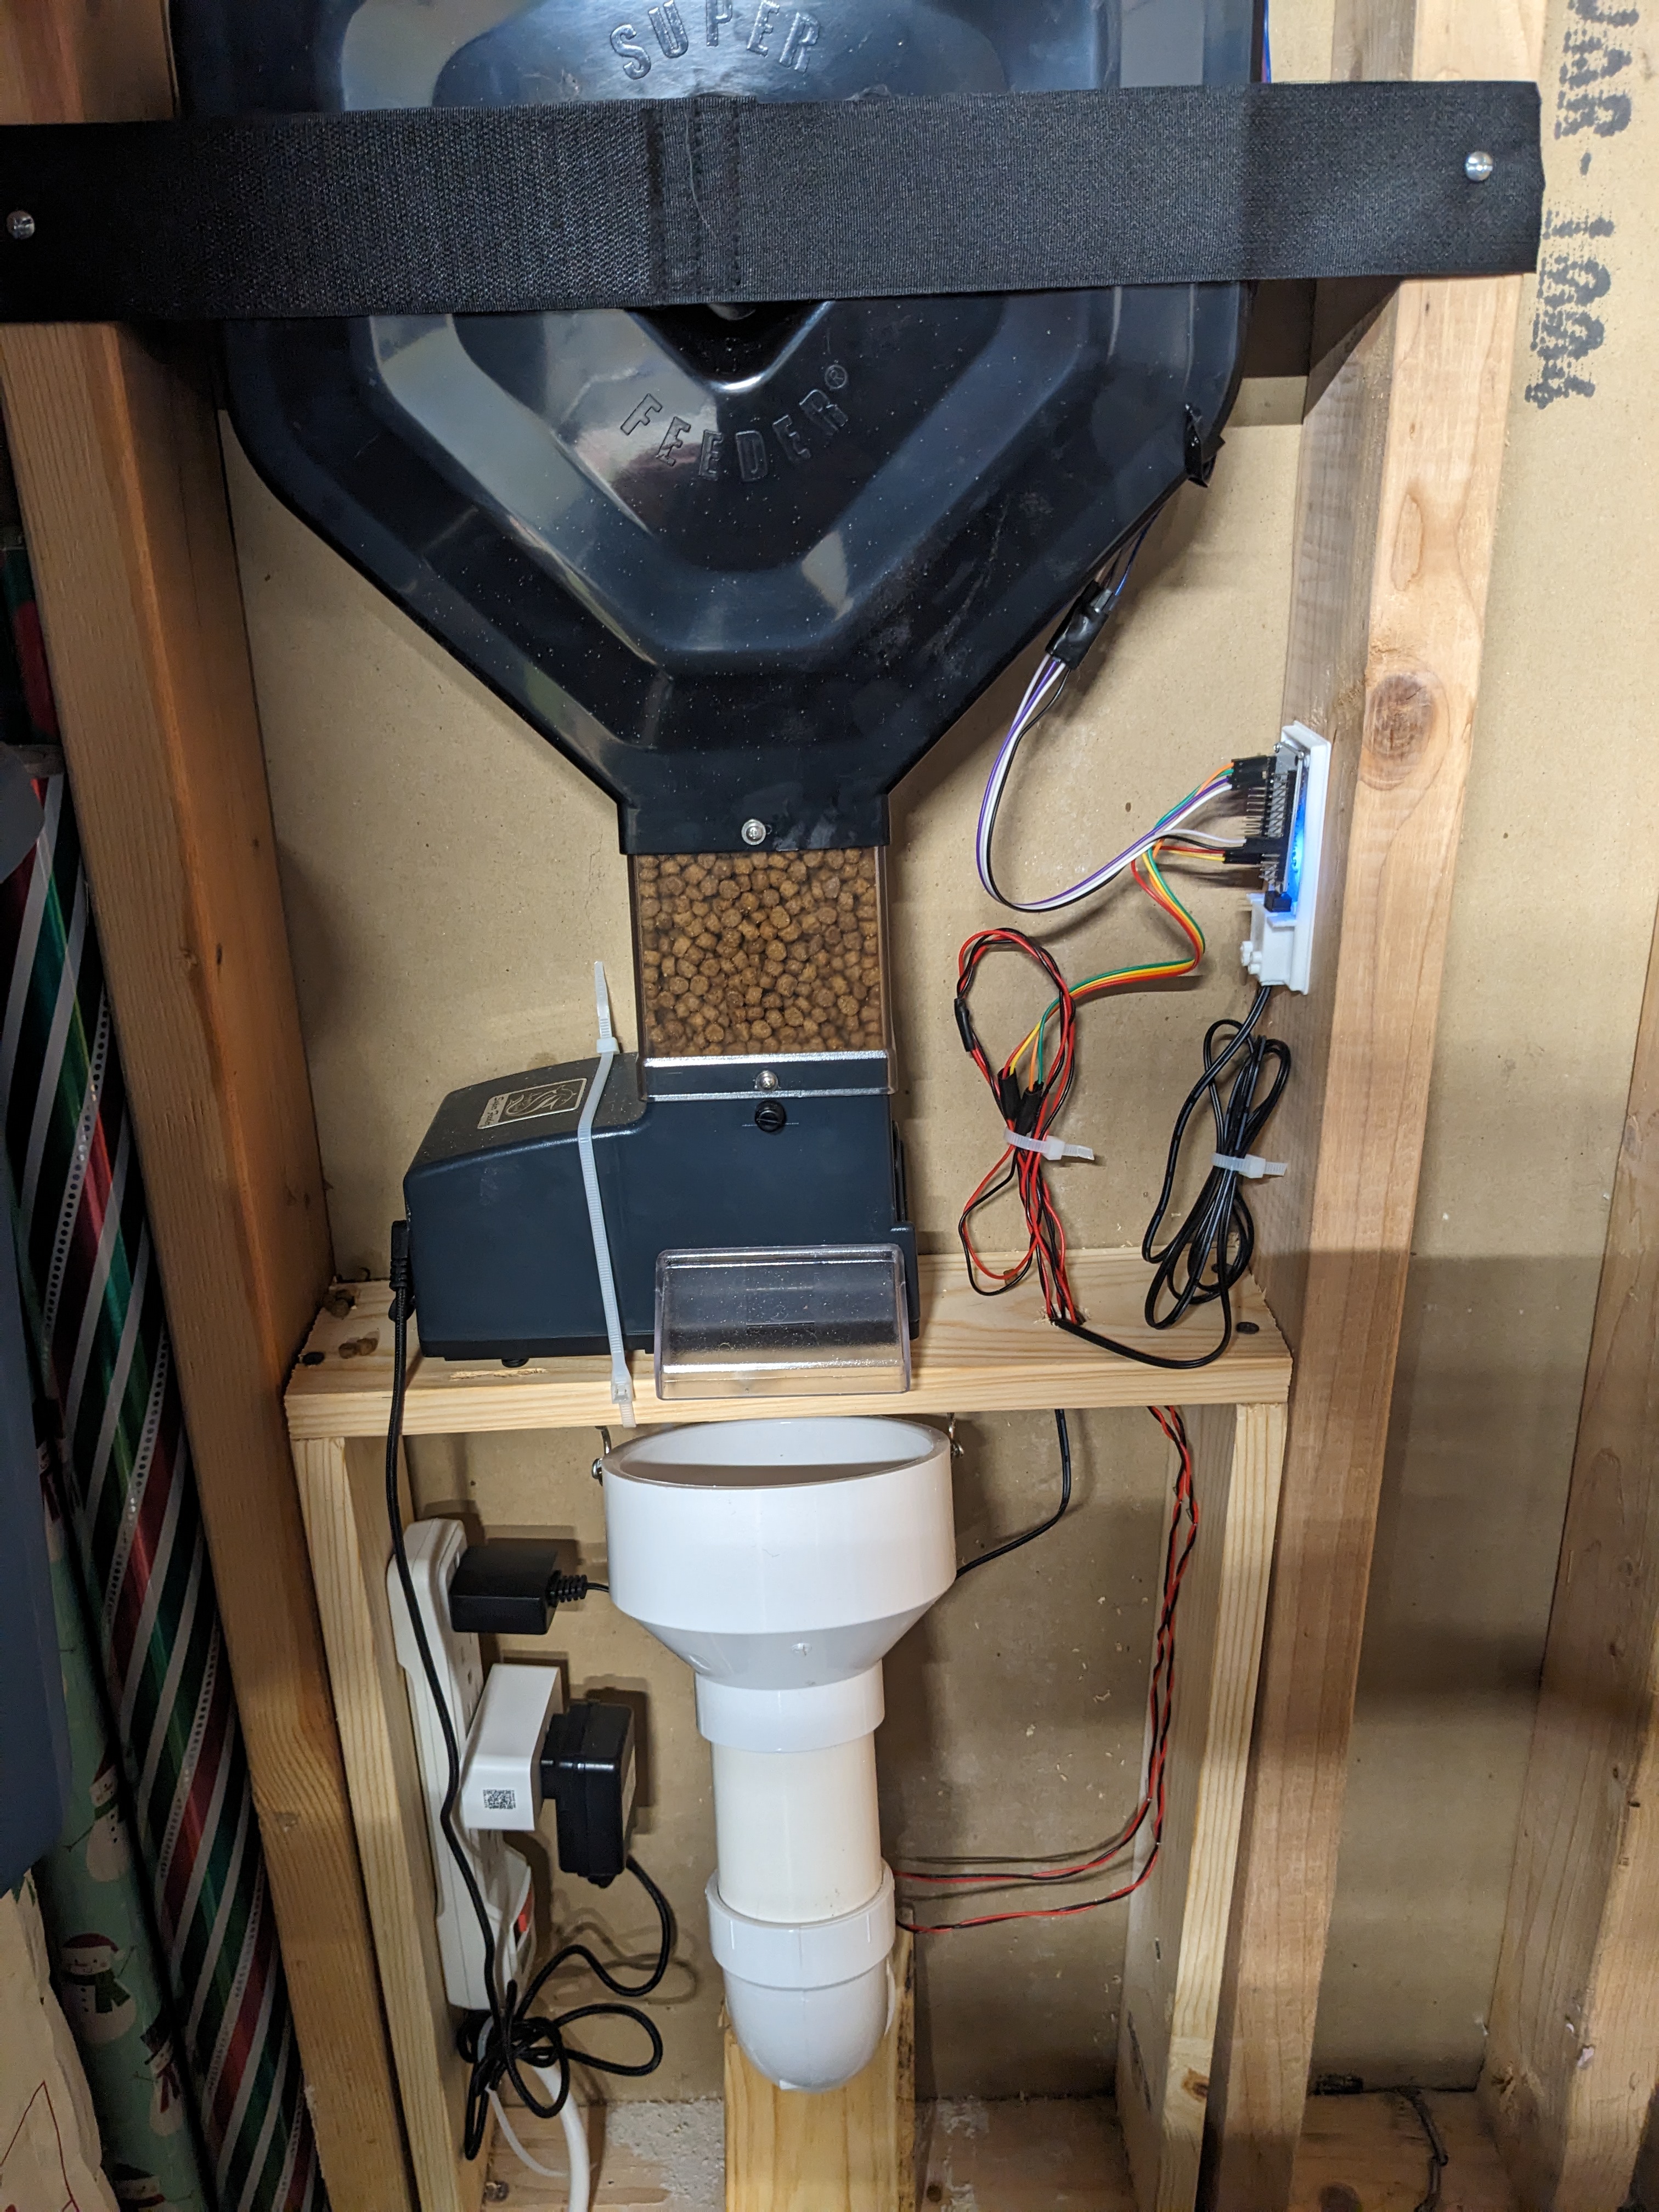
The coding of the sensors I’ll write-up below but here is a picture of the hardware setup. The load sensor is located in the laundry room under the cat bowl so these wires come back in through the same hole as the PVC chute. I used some cable covers to hide them as best I could. The ultrasonic sensor fits under the cap of the hopper to detect it’s fill level. Everything is wired into the ESP32 device mounted next to the feeder. I then added a surge protector to plug everything in. Note the Z-wave plug switch as well for the Super Feeder.

Automation Setup
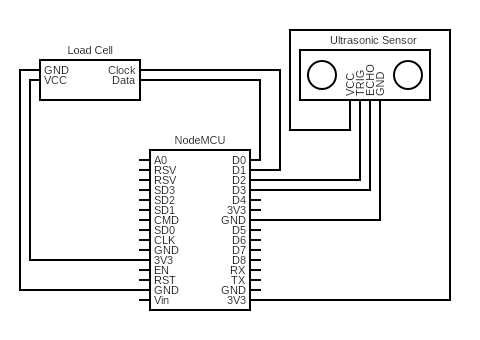
To get everything working in concert required programming the ESP32 device in ESPHome as well as some Home Assistant Automations. Below is my awful attempt at a circuit diagram to show the physical setup.

ESPHome
The two key devices to get working in ESPHome were the load sensor and ultrasonic sensor. As indicated in the ESPHome documentation the load sensor is not calibrated so I did that myself using some known weights. Once I had it working properly I weighed the food bowl empty and noted the weight (200g). I then weighed the bowl with varying amounts of food in it. I settled on 250g of food being a good amount to indicate that the bowl was full. In total everything should weigh 450g after a feed cycle. Using this information I created the following ESPHome sensors for the food bowl.
substitutions:
  bowl_weight: "200"  # weight of the bowl, in grams
  max_food_weight: "250"  # weight of food when full, in grams

sensor:
  - platform: hx711
    id: weight_sensor
    name: "Weight Sensor"
    dout_pin: D0
    clk_pin: D1
    gain: 128
    filters:
      - calibrate_linear:
          - -520017 -> 374
          - -537814 -> 235
    unit_of_measurement: g
    update_interval: 60s

  # calculates full percent based on current weight
  - platform: template
    id: bowl_food_amount
    name: "Bowl Food Amount"
    accuracy_decimals: 1
    lambda: |-
      return ((id(weight_sensor).state - ${bowl_weight}) / ${max_food_weight}) * 100;
    unit_of_measurement: "%"

binary_sensor:
  - platform: template
    name: "Bowl Present"
    icon: mdi:bowl-outline
    lambda: |-
      if (id(weight_sensor).state > ${bowl_weight}) {
        // bowl is on the sensor
        return true;
      } else {
        // the bowl has been removed
        return false;
      }
  # returns true if bowl is > 90% full
  - platform: template
    name: "Bowl Full"
    icon: mdi:bowl
    lambda: |-
      if (id(bowl_food_amount).state > 90) {
        return true;
      } else {
        return false;
      }
- Bowl Food Amount - this template sensor takes the output of the weight sensor and creates a percentage for how full the bowl is. This is based on the known full weight of 250g. If the current amount of food weighs 100g, that would be 40%. This template is used to drive most of the other sensors.
- Bowl Present - this is a binary sensor (off/on) in Home Assistant to detect if the bowl is even on the sensor. This is calculated by testing if the current reading is greater than the known weight of the empty bowl. Sometimes we remove the cat food and this allows for a check on if the bowl is at the end of the chute before food comes out.
- Bowl Full - another binary sensor that is triggered when the amount of food in the bowl is greater than 90%.
The ultrasonic sensor was very similar in the setup, minus the calibration. In the configuration below you’ll see I added a few filters. One was a lamda calculation to convert the distance from meters to centimeters. The distance I was dealing with was small so this made more sense. The other was to average out the reading via a moving average. This helped stabilize the readings a bit. I noticed in testing sometimes you’d get an odd reading every so often.
Due to the shape of the container the sensor couldn’t see all the way to the bottom but it was very close. I took several readings with the hopper very full and very empty. At full this distance is very small, less than 5cm. Almost empty was between 20cm and 22cm. This allowed for the creation of some similar template and binary sensors to trigger when the food level is running low.
substitutions:
  hopper_empty_distance: "20"  # distance measured from the top when hopper is empty
  hopper_full_distance: "5"  # hopper considered full if distance is this or less

sensor:
  - platform: ultrasonic
      name: "Hopper Distance"
      internal: false
      trigger_pin: D2
      echo_pin: D3
      unit_of_measurement: "cm"
      accuracy_decimals: 1
      filters:
        - sliding_window_moving_average:
            window_size: 30
            send_every: 5
        # convert meters to centimeters
        - lambda: |-
            return x * 100;
Home Assistant
Once the ESPHome device was functional it reported all the sensor information back to Home Assistant. In concert with the Z-wave switch I created a script and an automation to run the feeder.

The Script
The script was designed to run the actual feeder mechanism by toggling the Z-wave switch. I can use this on-demand or in an automation. The Super Feeder documentation states it needs a 2 minute cooldown between runs so that was accounted for here.
- Make sure the bowl is on the load sensor by checking the Bowl Present sensor.
- Turn off Z-wave switch if already on
- Turn on the Z-wave switch
- Wait 2 minutes
- Turn off the Z-wave switch
alias: Dispense Cat Food
sequence:
  - condition: state
    entity_id: binary_sensor.cat_food_monitor_bowl_present
    state: "on"
  - variables:
      switch_entity: switch.cat_feeder
  - if:
      - condition: state
        entity_id: switch.cat_feeder
        state: "on"
    then:
      - service: switch.turn_off
        data: {}
        target:
          entity_id: "{{ switch_entity }}"
      - delay:
          hours: 0
          minutes: 1
          seconds: 30
          milliseconds: 0
  - service: switch.turn_on
    data: {}
    target:
      entity_id: "{{ switch_entity }}"
  - delay:
      hours: 0
      minutes: 1
      seconds: 30
      milliseconds: 0
  - service: switch.turn_off
    data: {}
    target:
      entity_id: "{{ switch_entity }}"
  - delay:
      hours: 0
      minutes: 2
      seconds: 0
      milliseconds: 0
mode: single
icon: mdi:cat
The Automation
The automation was the culmination of all the previous work. This would finally feed the cats without any action needed by me (at least for a while) . I opted to go for a daily timer as a trigger instead of just dispensing every time the weight was less than full. There were two practical reasons for this.
- I didn’t want to startle the cats. Cats are known to be jumpy and if removing one food pellet suddenly triggered an avalanche of food to fly out of the chute they’d freak out.
- Conditioning. I wanted them to learn that the noise of the food coming out meant that food was available, much like the noise of me filling it each evening.
Once triggered a quick check is done to make sure that the bowl is present and more food is actually needed. The Bowl Full check isn’t done in the script since I wanted the option to add more if I felt like it. The star of the script is the Repeat action. This is script action I hadn’t used before. Essentially repeat is a while loop that tests if the bowl is full at the top of each run. If the bowl isn’t full it runs the dispensing Script again. I also added a second loop condition based on how many times the loop as executed. At most the repeat action will run 10 times before exiting. This should be more than enough times to fill the bowl unless the hopper goes empty during the cycle. Limiting the number to 10 prevents the loop from running endlessly.
alias: Fill Cat Food
description: >-
  Dispenses cat food as long as the bowl is present until full. Tries a max of 5
  times then fails.
trigger:
  - platform: time
    at: "15:00:00"
condition:
  - condition: and
    conditions:
      - condition: state
        entity_id: binary_sensor.cat_food_monitor_bowl_present
        state: "on"
      - condition: state
        entity_id: binary_sensor.cat_food_monitor_bowl_full
        state: "off"
action:
  - repeat:
      sequence:
        - service: script.dispense_cat_food
          data: {}
      while:
        - condition: and
          conditions:
            - condition: template
              value_template: "{{ repeat.index < 10 }}"
            - condition: state
              entity_id: binary_sensor.cat_food_monitor_bowl_full
              state: "off"
mode: single
Finishing Touches
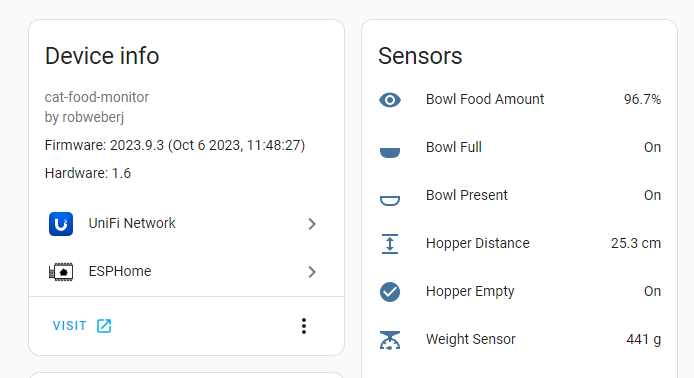
To finish everything up I added another automation to send me a push notification when the hopper starts to go empty. It triggers as soon as the binary sensor trips and then sends another reminder each day until I fill it. In our Lovelace dashboard I also added a visual for how full the bowl currently is so I can quickly check that things are working.
Overall this setup has been working really well and I get almost 4 weeks of food out of a full hopper. I’m not sure if the cats of caught on to the noise of the Super Feeder dispensing the food yet but they don’t seem freaked out by the chute coming out of the wall. There haven’t been any real issues with the automation and the bowl missing sensor has saved us from a floor full of food at least once. Compared to other solutions the Super Feeder does take up a lot more room but if it’s something that fits in your home I’d certainly recommend it. The thing is built solid and could be run off a simple power outlet timer if needed. I can see this running for years to come.
Power Outages
I saw this a lot on the Reddit forums so I wanted to address power outages very quickly with this setup. Many people are very concerned about power outages and automatic feeders. A lot of the commercial options come with a battery backup option. Personally I think this is a case of finding a problem where there doesn’t need to be one but it’s worth addressing.
First of all I wouldn’t ever count on this to just work if I was gone for any extended period of time. We always make sure someone checks on the cats at least every other day if we’re on vacation. We get maybe two brief power outages each year plus I made sure that all the feeder components, and Home Assistant itself, are plugged in to a UPS that provides about an hour of backup power. The UPS is integrated with Home Assistant and it will send a “last gasp” notification to our phones that the system is running on battery power if we’re not home. Under normal circumstances, when we’re home, we’ll know things are out of power and check the cat food as needed. If we were gone the cats would go, at most, 2 days before someone would check on them. A full bowl of food will last roughly that long so no one is going to starve if the power goes out. If our lifestyle was different and included a lot of days where the cats were alone in the house I’d have put more of a priority on redundancy.
Links
- The Super Feeder - module and dependable food dispenser
- ESPHome Load Cell - documentation for using a load cell with ESPHome
- ESPHome Ultrasonic sensor - documentation for using an ultrasonic sensor with ESPHome
- Home Assistant Repeat Action - Using Repeat in an Automation
- Circuit Diagram - online tool I used to create the circuit diagram
