
The Energy Management section of Home Assistant is very powerful. It allows you to visualize both consumption and generation (if available) of electricity in your home. In addition to whole home energy monitoring you can also setup individual devices within the system that are capable of capturing usage information. In my home I have a small UPS that provides backup power for all my home lab equipment. This includes my home camera system, NAS, wifi access points; basically all the main network components of my home. I wanted to see if it was possible to get usage information from this device into Home Assistant and see how much electricity it’s using compared to the rest of my home.
The exact UPS I have is an APC 850VA Backup Battery Power Supply. On it’s own this is not a device that reports energy consumption, at least not in a form Home Assistant can use for Energy Management. Through some custom automations and sensors however I was able to calculate this information.
Table of Contents
NUT Integration
Home Assistant has native support for Network UPS Tools (NUT). This is a protocol that supported UPS devices can use to present data about their operations. My APC device happens to support this. In my case I was able to connect the UPS directly to my Synology NAS via a USB cable. The Synology NAS has UPS support as well and will expose the information to Home Assistant. You’ll need to add the IP of your HA server as a “Permitted DiskStation Device” to allow this integration. Another option would be to plug the UPS directly to your HA server and talk to it directly. This is a little more involved since you’d need the NUT daemon (upsc) configured for your HA device as well.
Once configured a number of sensors are created in HA. The full list depends on your device but should be a subset of the following:
ups.timer.reboot: 0
battery.voltage: 27.0
ups.firmware.aux: L3 -P
ups.mfr: American Power Conversion
battery.runtime.low: 120
ups.delay.shutdown: 20
ups.load: 19
ups.realpower.nominal: 600
battery.charge.warning: 50
battery.charge.low: 10
ups.vendorid: 051d
ups.timer.shutdown: -1
ups.test.result: No test initiated
ups.firmware: 868.L3 -P.D
battery.mfr.ups.serial: 3B1519X19994
ups.productid: 0002
battery.runtime: 2552
battery.voltage.nominal: 24.0
battery.type: PbAc
ups.mfr.ups.status: OL
ups.model: Back-UPS RS1000G
ups.beeper.status: disabled
battery.charge: 100
input.sensitivity: medium
input.transfer.low: 88
input.transfer.high: 147
input.voltage: 121.0
input.voltage.nominal: 120
input.transfer.reason: input voltage out of range
output.current: 1.10
output.frequency: 60.20
output.voltage: 121.50
output.voltage.nominal: 120
I’ve found the most useful ones to be the much smaller list of:
ups.load- the current load on the device, as a percent of total available power outputups.mft.ups.status- the current statusinput.voltage- the input voltage to the devicebattery.runtime- estimated runtime based on current load (in seconds)battery.charge- the percentage the battery is charged toups.realpower.nominal- the rated max wattage of this device
Fun Nugget: The input.voltage is particularly useful as you can use this to setup automations based on power outages. If the input voltage drops you know something is up with the power in your house.
Calculating Energy Consumption
In order for the Home Assistant Energy Dashboard to show a device it needs to have information on the energy usage. The units of measure for this are kilowatt hours, or watt hours. Any individual device will demand a certain amount of power and the amount of time it’s using it will accumulate kilowatt hours. The simplest example if you had a device that demanded 1 kilowatt of power and you left this device on for 1 hour, it would use 1 kilowatt hour of energy. Not to belabor the point, but a more complicated example might be something like a Raspberry Pi 4 that could consume between 3.8 and 5.0 watts of power at any given moment depending on the load. To make the math easy let’s use 5W and leave our device on for 2.5 hours. To calculate the energy usage over time we can use the following:
watts = 5
time_on = 2.5  # the time on is in hours

# turn watts into kilowatts
kw = (watts/1000)

kWh = kw * time_on
print(kWh)
In our example above we’d get 0.0125 kWh. We’d have to leave this device on for 200 hours to consume 1 kWh of energy.
Looking through the sensors created by my APC device, it does not keep track of kWh usage on it’s own. Many sensors, especially power plugs, have this kind of logic built right into them. For the APC I needed to calculate the energy based on the information I do have access to. Two sensors will be useful for this, the ups.load and ups.realpower.nominal. The real power value represents the manufacturers max allowable wattage for this device. Without causing hardware damage my UPS can output 600 watts of power at a single point in time. The load sensor is a percentage that the UPS calculates based on the max power. If the load is at 42%, that should mean it’s currently drawing 252 watts of electricity. Since the energy dashboard needs kilowatt hours I can calculate the watts used over time by checking the real time power every 5 minutes.
# load percent * max load
current_power = (current_load/100) * max_load

# multiply the power by the time increment
wH = current_power * (5/60)

kWh = wH/1000
The 5 minute check here is important. The more often you check the more accurate your energy consumption calculation will be. I choose 5 minutes as my equipment should have a fairly consistent power draw. If you load changes often you could check every minute and then multiply by 1/60 since each check will represent one minute in the hour. Gathering some data over an hour will yield values like the following:
| Time | Load | Watts | Watt Hours |
|---|---|---|---|
| 12:00 | 48% | 288 | 24 |
| 12:05 | 50% | 300 | 25 |
| 12:10 | 52% | 312 | 26 |
| 12:15 | 50% | 300 | 25 |
| 12:20 | 48% | 288 | 24 |
| 12:25 | 48% | 288 | 24 |
| 12:30 | 48% | 288 | 24 |
| 12:35 | 50% | 300 | 25 |
| 12:40 | 50% | 300 | 25 |
| 12:45 | 51% | 306 | 25.5 |
| 12:50 | 48% | 288 | 24 |
| 12:55 | 48% | 288 | 24 |
| Total | 295.5 |
I’ve also written a Python script of the energy calculation as I was data gathering to make sure the numbers all looked right. Now that energy consumption can be calculated all of this can be setup in Home Assistant.
Setting Up Home Assistant
Creating the automations and sensors in Home Assistant will require the use of the MQTT integration. We’ll use a custom topic to retain the energy usage for the UPS. We’ll simply add the usage from the device as an ever increasing value. The Statistics functionality of Home Assistant can use this to break down the changes in usage by whatever time period you select in the Energy Dashboard.
MQTT Sensor
Assuming MQTT is already setup and working in Home Assistant, creating the MQTT sensor is easy. Below is the YAML for the HA config file.
sensor:
  - platform: mqtt
      name: Basement UPS Energy
      state_topic: 'homeassistant/energy/basement_ups/total'
      value_template: "{{ value }}"
      unit_of_measurement: 'Wh'
      state_class: 'total_increasing'
      device_class: 'energy'
A few things to point out. The first is the state_topic, this is the topic on the MQTT server that will hold the energy value (more on that below). The unit_of_measurement tells HA what the units are for this value. If you’re calculating your energy in killowatt hours you’ll want to change this. I’m using watt hours. The state_class tells HA that this value will continue to increase over time as we’re adding each value to the previous. More information on available state classes can be found in the HA documentation. Finally the device_class informs HA that this is an energy measurement. This is technically optional but makes the definition more complete and easier to understand.
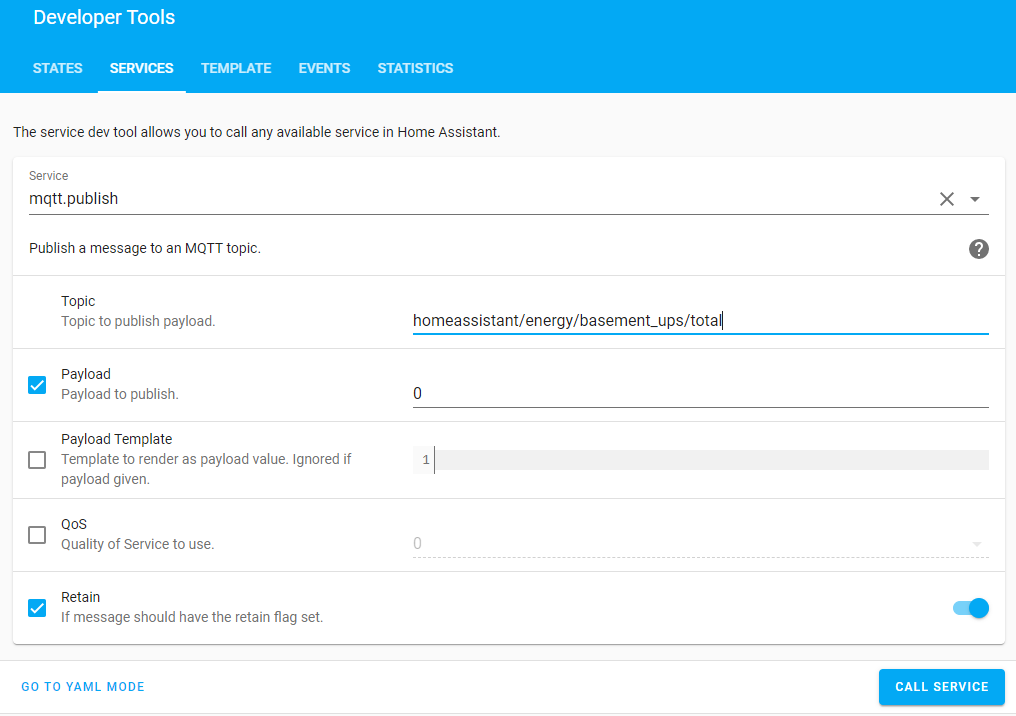
Setup MQTT Value
Now that the sensor is setup we’ll want to set the value to 0 as a starting point. This can be easily done in the Developer Tools area of Home Assistant. Setup the mqtt.publish service as shown in the image below to setup the topic with a 0 value. Make sure to check the retain flag as this will keep the value in MQTT perpetually.
Automation
To collect the data automatically we’ll setup an Automation. As in the calculations above this automation will get the current load from the UPS every 5 minutes and save the value to the MQTT sensor. This increasing value is something the Energy Dashboard can use to graph the energy usage.
alias: Basement UPS Energy
description: ''
trigger:
  - platform: time_pattern
    minutes: /5
condition: []
action:
  - service: mqtt.publish
    data:
      retain: true
      topic: homeassistant/energy/basement_ups/total
      payload_template: >-
        {% set current_power = ((states('sensor.basement_ups_load') | float)/100
        * states('sensor.ups_nominal_real_power') | float)%} {{
        states('sensor.basement_ups_energy') | float + (current_power * (5/60))
        }}
mode: single
The trigger for the automation is a simple time based trigger, set to every 5 minutes. Using the same mqtt.publish service it’s taking the current value of the MQTT sensor and adding the newly calculated value. The calculation being done is the same as shown above but using the HA Templating script. The states() function pulls in the current state of an entity in Home Assistant, which we’re casting to a float using a filter. The rest should be pretty easy to follow.
Conclusion
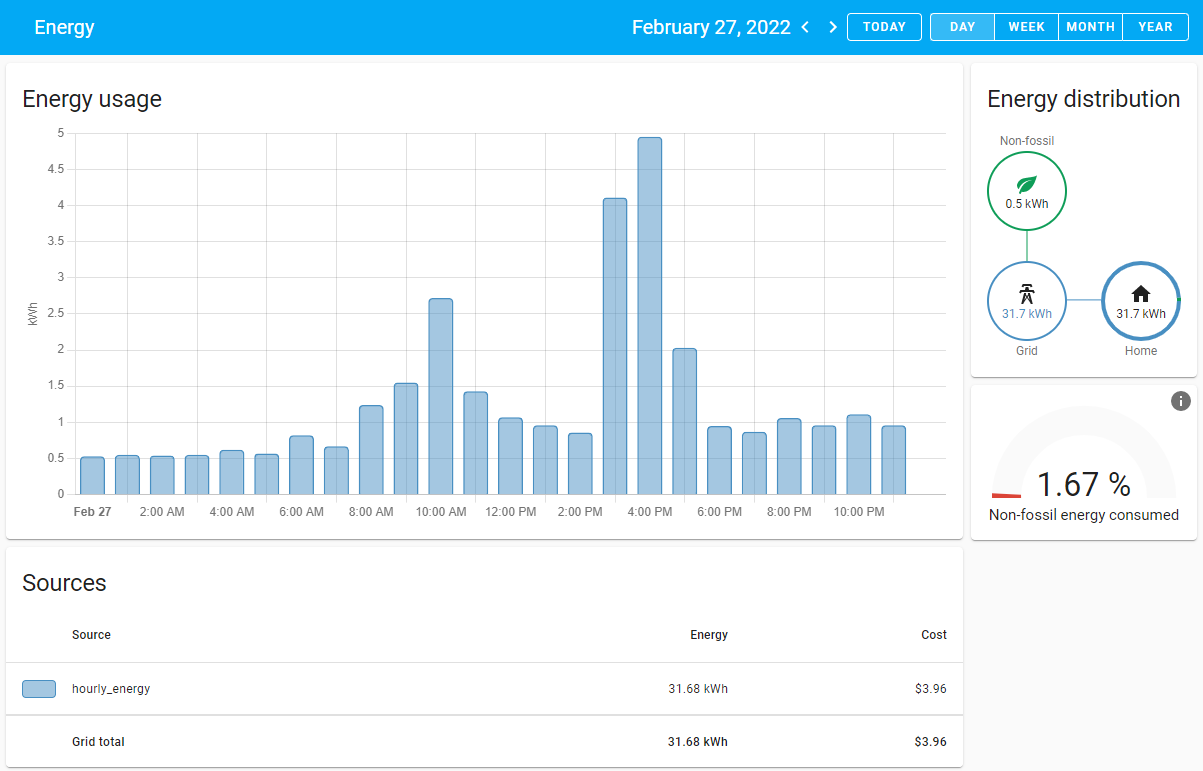
Once this is all setup Home Assistant does need to be restart to pull in the MQTT sensor from the config file. After that you should see the value of the sensor changing every 5 minutes; assuming the UPS has load. Within the Energy Management dashboard you can now add this sensor as an individual device and see the energy usage information.
In my case I’ve learned my home network setup consumes about 4.5kWh of electricity a day. This is approx $16 a month based on my energy rates. More than I would have hoped but I am running a 4 drive NAS and a tower converted in to a VMware Hypervisor. Overall this was a fun project to see if the data could be captured and give me more visibility into the true cost of my equipment.