
This is the second of a two-part post. Part 1 is standalone and details everything done with basic Home Assistant components. Part 2 goes beyond and explains the training of a custom image model to detect if trash bins are present in the camera frame.
As I was working to make trash day reminders more accurate (detailed in Part 1), I thought it would be a fun project to lean on AI to help detect if trash bins are in the driveway. Since this was a stretch goal and really unnecessary for the entire idea to work I split it off into it’s own project. From a practical perspective the AI component reduces the amount of feedback I have to manually put into the system by determining when the trash bins were put out and automating the “checkbox” process of determining that work is done.
In this post I’m going to detail how I leveraged the DOODS integration in Home Assistant, and a custom object detection model, to accomplish this goal.
Table of Contents
Prerequisites and Workflow Selection
As with any project I started with a specific objective in mind, and a list of prerequisites. The objective is to have a detection mechanism for determining when the trash bins are, or are not, at the end of the driveway. This will drive an automation to mark a Trash Cans Put Out input boolean helper in Home Assistant. As far as prerequisites they are:
- Leverage existing video cameras on our house (luckily one can see the driveway already)
- Integrate with Home Assistant easily
- Run fully local within my home network
The last bullet point is really the critical one. A very easy way to do this would be to toss the image to a cloud LLM or other paid service. I didn’t like this for a few reasons. The first is that it creates a cloud dependency, the second is the potential for additional costs, and the third is privacy. A fourth, less serious, reason is that building it myself is part of the fun.
Even with locally running as a requirement there are two ways to attempt this type of object recognition. The first would be to utilize a local LLM with vision capabilities. The other would be to utilize a more traditional object detection model. Each has some pros and cons.
Local LLM
A vision capable LLM model should be able to handle this task. I do run an Ollama setup locally and could leverage a vision capable model. Home Assistant has great integrations, such as LLM Vision, that would work for this purpose. Breaking down the pros and cons of an LLM approach this is what I came up with:
| Pro | Con |
|---|---|
| Easy integration | Inference speed |
| Existing infrastructure | LLM reliability |
In the con column both speed and reliability are concerns here. An LLM wouldn’t be able to keep up if I decided to simply stream video directly for object detection. In past LLM Vision testing I’ve noticed a 30-60 second delay when running this locally. Reliability is also a concern since I don’t want a generic description but a simple yes/no. Even with explicit instructions local models will often add details or not format results properly.
Object Detection Model
Home Assistant also has support for generic image processing, such as object detection. Looking at the pros and cons of this approach it’s essentially the inverse of the LLM approach:
| Pro | Con |
|---|---|
| Inference speed | Need to setup infrastructure |
| Reliability | Existing model may not be available |
The main downside to this approach is the complexity. An accurate, already trained, model may not be available. If I couldn’t train one myself the object detection approach may not even be available.
Selection
Ultimately I elected to go with finding, or training, an object detection model. Speed and accuracy were both very important for this particular project. The LLM approach is great if for a general summation of the image but in this case I needed a specific number. Object detection models are tried and true at this kind of thing so using the specialized tool in this case made the most sense to me.
Model Selection
Committing to the object detection approach, I needed to make sure I could integrate it with Home Assistant. After some searching I decided to use DOODS as my Home Assistant integration point. It has a native integration and can be tailored to serve a variety of model types. Specifically I was interested in the YOLO family of models from Ultralytics. YOLO stands for You Only Look Once, meaning features are extracted from a single pass over the image. The result is fast and accurate detection from a well trained model. I’ve used this type of model before and knew it came with a variety of pre-trained objects.
Model Fine Tuning
Although YOLO comes with support for 80 different built in object types, a trash bin wasn’t one of them. I’ll spare the exact details but I also struck out trying to find a model on various model sharing sites like Hugging Face. Luckily the YOLO model can be fine tuned since it already excels at object detection.
Trash Bin Images
Problem one with training a new type of object class is that you need annotated (labeled) images of the object. If training a model from scratch this could be thousands of images. In this case, however, I can leverage a lot of the baseline work and simply fine-tune the existing YOLO model. For this I could get by with maybe 100-200 images. Granted, more is always better. Ultimately it only has to work for identifying in my driveway. I don’t care about other environments or general situations.
Again, here I struck out in finding a dataset of existing trash bin images. There are plenty of datasets for trash, but I really just need the bin. I was almost ready to declare defeat (and return to looking at the LLM option) but I had a lucky break. I own a Tesla, which can record videos of my drives. It occurred to me that if I drive around a few neighborhoods on trash pick-up day I could probably generate a good amount of trash bin images very quickly. As an aside, I didn’t feel too creepy about this approach since trash bins are within view of the road way (public space) and I have no intent on sharing these images. I didn’t feel that any privacy was breached by using the camera footage for training data.
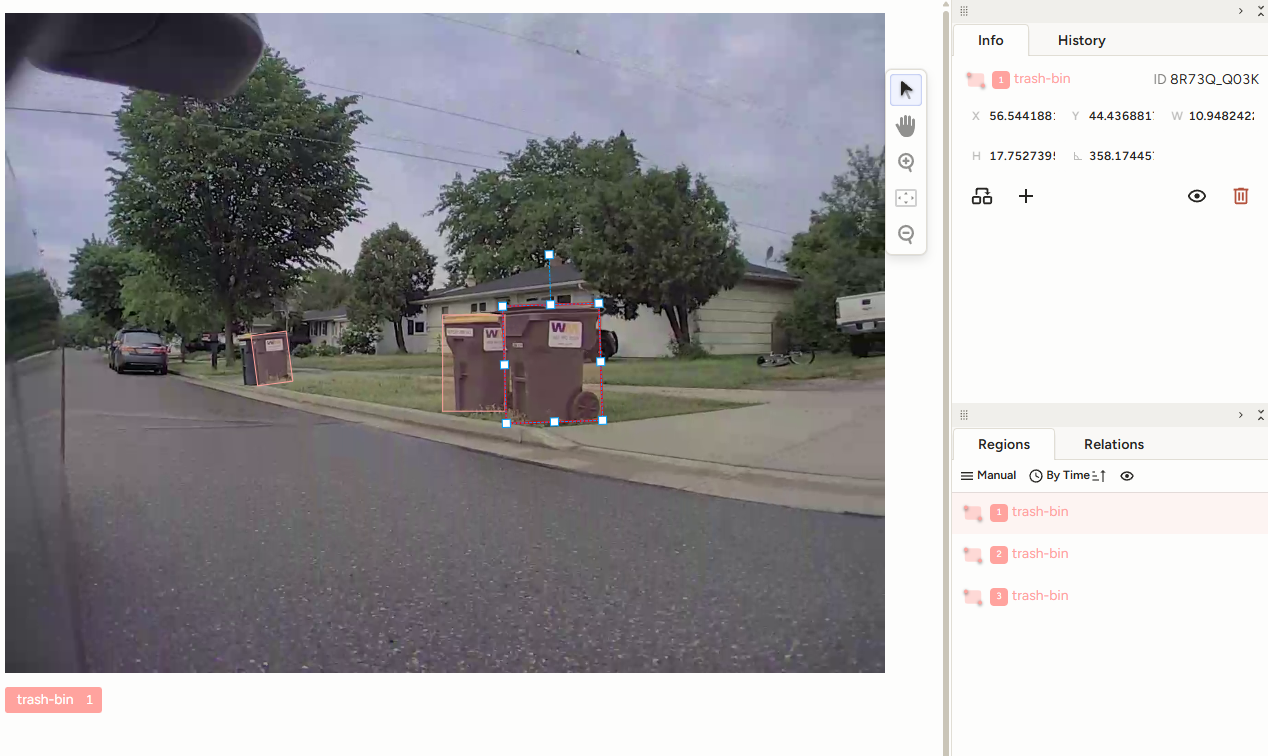
The final step was annotating the images so they could be used for model training. Leaning on another great open source project, Label Studio, I would be able to quickly label the images and export them for use in fine tuning the YOLO model. Label Studio can easily run in a Docker container and even contained an export in the format YOLO needed.
My workflow became as follows:
- Download TeslaCam footage
- Utilize VLC to scan the footage and screenshot any trash bin images.
- Upload the images to Label Studio
- Annotate the images
- Download the Label Studio project in the YOLO format
Very quickly I was able to capture over 100 images over the course of 2 weeks with a little extra drive time on trash pick-up days. Below is a screenshot of annotating these images using Label Studio. All in all I had about 90 minutes of extra work in taking the screenshots and labeling the images.
Creating a Dataset
The Label Studio export contained the images and annotated data for each image appropriate for fine tuning the model. For proper training these images should be separated into training and validation sets. The training set is used to adjust the model weights (training) and the validation set is used to test the new model against previously unseen data. The validation step is how metrics can be established for benchmarking the model’s performance. I crafted a quick script to divide up the images/labels and create a directory structure and YAML file for YOLO training based on the website’s documentation.
Training The Model
Finally I could try and train the model to detect trash bins as an object. Leaning on the YOLO documentation I created another helper script to facilitate the training process. Utilizing the datatset.yaml file created in the preparation step, the YOLO library automatically trains and validates against the prepared images. I stated with only a few epochs (rounds) to make sure things were working. For the final model I trained for 100 epochs. Freezing some of the model layers sped up training since the YOLO model already had a good detection backbone. Some of the other hyperparameters were changed from the defaults as well, namely the image size and tweaking the default augmentations. Full code, with comments, is in a Gist. Note: I did this on a device that could leverage a GPU for speed. It took about 15 minutes per run. At the end I was presented with a few metrics. The best model had the follow stats:
| Precision | Recall | mAP50 | mAP50-95 |
|---|---|---|---|
| 94.7 | 91.6 | 95.9 | 79.5 |
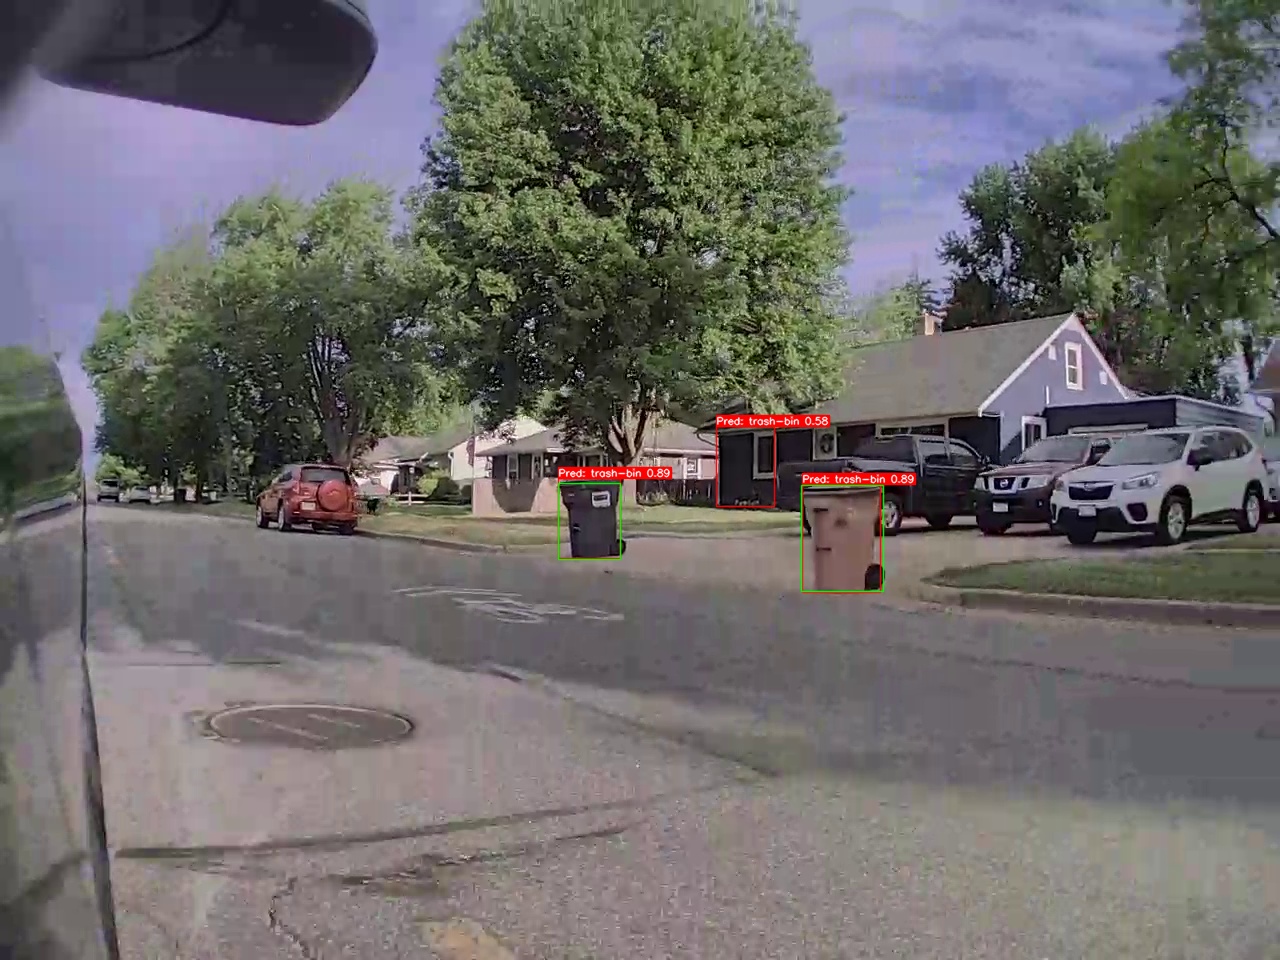
Metrics for detection models are based on IOU, or intersection over union. Basically it’s how much of the model’s predicted bounding box overlaps with the labeled data. The mAP50 value is a percentage for how many predictions from the validation set overlapped with at least 50% of the true labeled data. The mAP50 data is used to categorize each prediction as either true positive, false positive, true negative, or false negative. The counts for these categories are used to calculate the precision and recall values. Precision is a measure of how accurate the model is at detecting against the validation set. In the validation images, out of all the objects identified as a trash bin it was correct 94.7% of the time. Recall is a measure related to identifying the actual objects present in the image. In this case the model was able to identify 91.6% of all actual trash bins in the validation images. What about the final mAP50-95 value? This value tests at higher overlap values between 50% and 95%. For a very accurate model you want this number to be as high as possible. The image below illustrates the predicted object box (red) vs the labeled data (green) in a validation example. Also note the completely wrong prediction on the house.
I intend to train this model more over time, but for a first pass it’s fairly good. On brand new images I have a high degree of confidence it will detect a trash bin; at least at the end of my driveway where the image quality and positioning is ideal.
Home Assistant Integration
With a working model, next came the part of integrating it with Home Assistant. As mentioned earlier, I am using DOODS as the integration method. DOODS integrates with Home Assistant as an image processing entity. These types of entities send the snapshot image from a camera to the integration and return a count of the number of objects detected, along with a description of the objects as part of the entity attributes. Since I’m only looking for trash bins, the count is really all I need.
DOODS Setup
Getting DOODS up and running is pretty easy using the default instructions and Docker container. If attempting this yourself I’d recommend utilizing a device with a GPU for the quickest model inference times. Out of the box DOODS has some default models. The instructions weren’t very clear but eventually I figured out how to override the default configuration and add my own model. It involved modifying the docker-compose.yaml file to mount an extra directory, and pointing to the custom model in the default config. Once it is setup you can test the model manually via the DOODS web interface.
# compose file
services:
  doods:
    image: snowzach/doods2:amd64-gpu
    environment:
      TORCH_HOME: /home/user/doods
    ports:
      - "8080:8080"
    volumes:
      - ./config.yaml:/opt/doods/config.yaml
      - ./models:/opt/doods/models
    deploy:
      resources:
        reservations:
          devices:
            - driver: nvidia
              count: 1
              capabilities: [gpu]
# config.yaml file
server:
  host: 0.0.0.0
  port: 8080
  metrics: true
logging:
  level: info
doods:
  log: detections
  boxes:
    enabled: True
    boxColor: [0, 255, 0] # Or hex string "#00ff00"
    boxThickness: 1
    fontScale: 1.2
    fontColor: [0, 255, 0] # Or hex string "#00ff00"
    fontThickness: 1
  regions:
    enabled: True
    boxColor: [255, 0, 255] # Or hex string "#ff00ff"
    boxThickness: 1
    fontScale: 1.2
    fontColor: [255, 0, 255] # Or hex string "#ff00ff"
    fontThickness: 1
  globals:
    enabled: True
    fontScale: 1.2
    fontColor: [255, 255, 0] # Or hex string "#ffff00"
    fontThickness: 1
  detectors:
    - name: trash
      type: yolo
      modelFile: models/trash.pt
mqtt:
Home Assistant Setup
Following the DOODS Integration instructions I added the information to my HA configuration file to point my camera at the model. I have this checking every 15 minutes. The processing being done here is pretty minimal and this was easier than trying to narrow down a strict detection window. Within 15 minutes of putting the bins out they should be found. To try and avoid false positives I also narrowed down the search region to the top part of the image, where the end of the driveway is visible, and set the prediction confidence level to 75%.
image_processing:
  - platform: doods
    url: 'http://IP:8080'
    scan_interval: 900  # every 15 min
    detector: trash
    confidence: 75
    area:
      top: 0
      right: 0.85
      bottom: 0.30
      left: 0.15
    source:
      - name: "Trash Bin Detector"
        entity_id: camera.front_yard_medium_resolution_channel
    file_out:
      - "/config/media/doods/{{ camera_entity.split('.')[1] }}_{{ now().strftime('%Y%m%d_%H%M%S') }}.jpg"

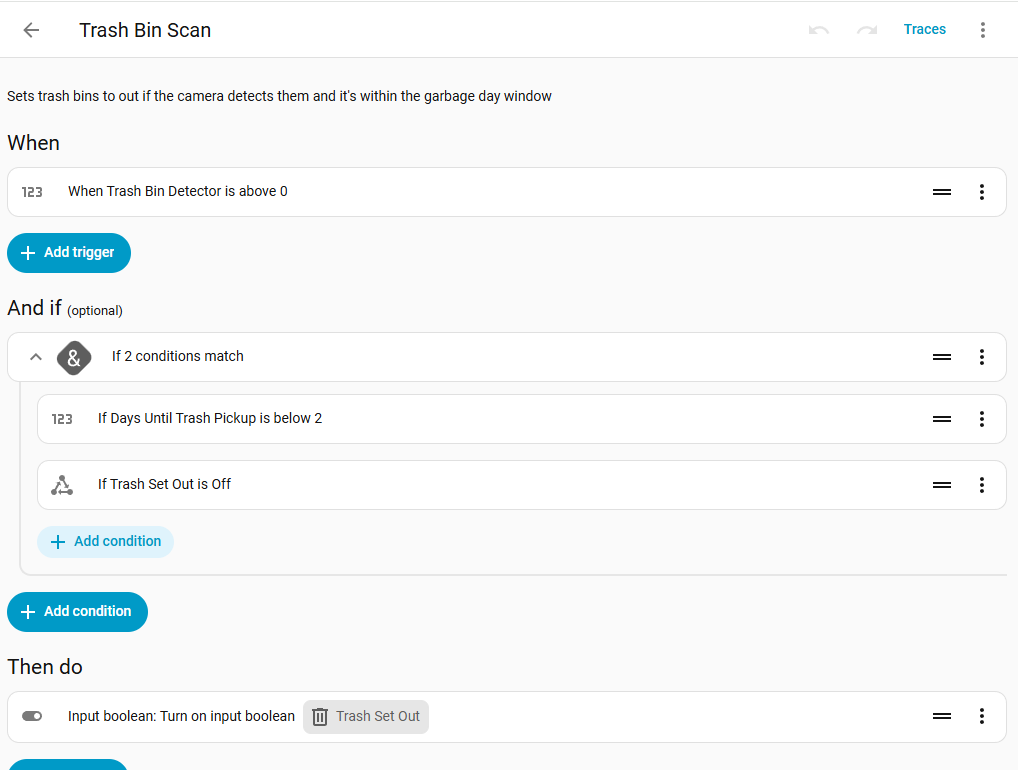
The final step was configuring an Automation to fire when the trash bins were found. Trying to again minimize the impact of false positives I added a few conditions to make sure the automation triggered within a window where it was relevant. For me this is when garbage pick-up is less than one day away, and the bins haven’t already been detected prior.
I was beyond excited, probably for the only time ever, to bring out the trash bins the first week this was live. As expected the image processing integration detected the bins which triggered the Automation. The other automations I had already configured did the rest of the work in keeping track of the calendar and days until pickup notifications. Absolutely no excuse to be caught unawares that it was trash pick up day!
Part 3….?
While I only intended this to be a two part project (due to length) I did find myself wondering if an LLM could be just as accurate in this situation. Since I have the training images I plan to run a comparison of the trained model vs a local LLM with vision capabilities. If nothing else it can put my assumptions from the pro/con tables to the test.
This was a really fun way to get some hands on work with object detection model training. I didn’t expect to have to create the dataset so that added a new component I hadn’t done before. If I ever a more serious use for model training I’ll have some experience to pull from.
Links
- Helper Scripts - a link to some Gists for training the model
- YOLO Model Documentation - documentation for Ultralytics YOLO models
- Label Studio - Open Source labeling software
- DOODS - Open Source object detection web service
- DOODS Integration - The DOODS Home Assistant integration